


 (1)-20251204034946188.jpg)


Welcome to OSCAL (Well-known China brand of Android tablets, rugged smartphones, and portable power stations) blog. Hope this guide has been helpful.
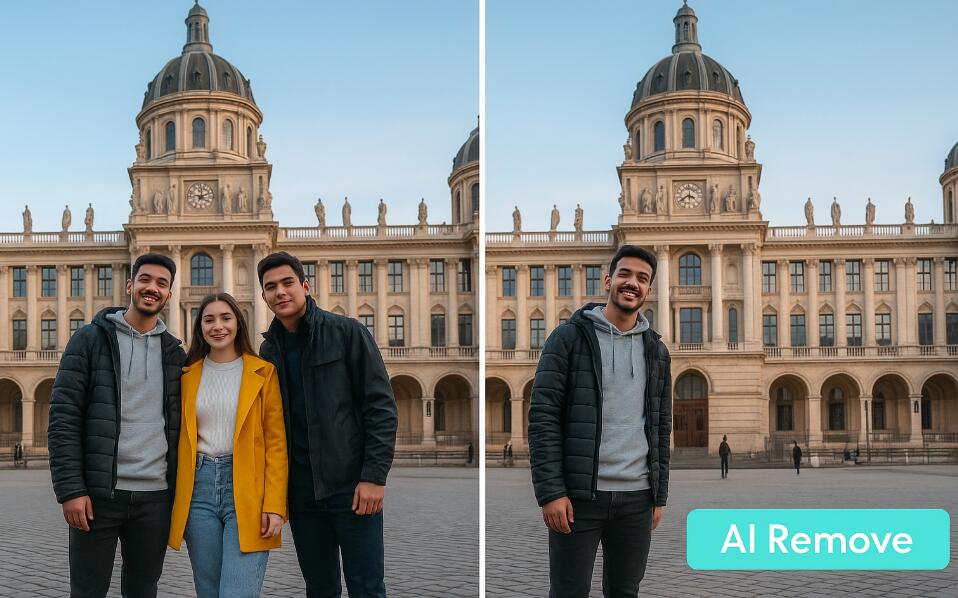
Removing people from photos is a common task for photographers, designers, and casual users alike — whether you want to clean up the background, remove a photobomber, or create a composite image. Modern AI tools make this surprisingly easy: many mobile apps and web apps can detect people and intelligently reconstruct the background behind them so the result looks natural.
- How to remove clothing wrinkles in photos with AI?
- How to check what you look like as a man with male version of me filter?
This guide explains multiple approaches and gives detailed, step-by-step instructions for four popular AI tools and platforms, plus practical tips for getting the best results, troubleshooting, and finishing touches. I cover both mobile and web-based workflows and show how to decide when to rely fully on automatic AI removal and when to combine it with manual retouching for the most realistic outcome.
Before we dive into the software specifics, you’ll find quick primers on choosing the right photo, preparing your image, and understanding the limitations and ethical considerations of removing people from pictures. These foundational ideas will make the stepwise instructions that follow much more effective.
Quick primer: when to remove someone and how to prepare your image
Automatic removal tools work best when the background behind the person is relatively uniform or contains repeating textures (sky, grass, plaster, brick patterns, pavement). They are less reliable when the person stands in front of complex, unique features (faces on posters, text, intricate architectural details). Preparation improves results significantly.
- Choose the highest-resolution original available: AI inpainting performs better when it has more pixels to reconstruct details.
- Crop to the area of interest first: removing excess surrounding background helps some tools focus and run faster.
- Duplicate your original file before editing so you always have the untouched version to fall back on.
- If possible, select images where the person doesn’t overlap important or unique objects (signs, faces, landmarks).
Ethics and legal considerations
Always think about consent, privacy, and copyright before removing people from photos. Don’t remove people in a way that misrepresents events, attempts to defame, or violates privacy rights. For commercial use, verify that you have the appropriate rights to edit and publish the image. Removing a person from a group photo for personal use is usually fine; using edited images in marketing or journalism may require additional permissions or disclosures.
General workflow used across tools (overview)
Although each app has its own interface and terminology, the underlying workflow is often similar. You’ll typically follow these phases:
- Import/Upload: Open the photo in the app.
- Detect or Select: Use an automatic object/person remover or manually paint/mark the person to remove.
- Inpaint / Fill / Remove: Apply the AI content-aware fill that reconstructs the background.
- Refine: Use clone, heal, or brush tools to fix artifacts and seams.
- Export: Save the final image in desired format and resolution.
AI App 1: Pixelcut — detailed step-by-step
Pixelcut is focused on quick background and object removal workflows, especially for product and lifestyle shots. The app uses AI to separate subjects from backgrounds and also offers a content-aware fill functionality for removing objects or people.
Step-by-step (mobile app):
- Open Pixelcut and tap the “+” or “Upload” to import your photo from the camera roll or cloud storage.
- Choose the editing mode: select “Remove Background” if you want to isolate the subject, or look for a tool labeled “Remove Object” / “Erase” / “Clone” for person removal.
- If there is an automatic “Remove Person” or “Erase” AI button, tap it — Pixelcut will attempt to detect people automatically and remove them. If not, switch to manual mode and use the brush to paint over the person you want to remove. Use a slightly larger brush for broad coverage and a smaller brush for edges.
- Tap “Apply” or “Inpaint” to let the AI reconstruct the background. Wait a few seconds while Pixelcut analyzes surrounding pixels and fills the area.
- Examine the result at 100% zoom. Use the “Heal” or “Clone” tools to fix visible seams, repeated patterns, or missing details. For example, if a person is removed from in front of a brick wall and a seam appears, clone nearby brick patterns over the seam and heal to blend edges.
- If colors or lighting look off, use the Color/Exposure adjustment tools to subtly match the retouched zone to the original image. Pixelcut often provides global adjustments — use them sparingly.
- When satisfied, export the image. Choose a high-quality JPEG or PNG. If you need transparent backgrounds, export a PNG with transparency enabled (if removing persons to isolate other subjects).
Step-by-step (web):
- Visit the Pixelcut web editor and sign in.
- Upload the image through the “Upload” button or drag-and-drop.
- Select “Erase” or “Background Remove” from the toolbar. If a “Smart Remove” option is present, try it first — it uses person/object detection.
- Use the brush or lasso selection to mark the person. Many web versions allow a “Detect” toggle to auto-select people.
- Click “Remove” / “Apply” and wait for the inpainting. Review and use the web’s clone/heal brushes for fine corrections.
- Download the finished image choosing format and quality options.
AI App 2: Canva — detailed step-by-step
Canva has grown beyond simple layout design and includes effective background removal powered by AI. While Canva’s feature is often used to remove backgrounds around a subject, it can also remove people if you use a combination of background remover and retouching tools.
Step-by-step (web and mobile — Canva Pro required for some features):
- Open Canva and start a new design or upload a photo directly to the editor canvas.
- Select the image on the canvas. In the toolbar, click “Edit image.”
- Find and click the “Background Remover” tool. Canva will remove the main subject’s background automatically. This helps when your goal is to isolate a different subject, or to hide a person who is the background subject.
- If you want to remove a specific person who is not the main subject, use the “Erase” tool under “Edit image.” Choose a brush size and paint over the person. Use the preview to check the inpaint result after you click “Erase” or “Apply.”
- When the automatic result leaves artifacts, switch to the manual “Restore / Erase” sub-tools to correct edges: “Restore” will bring back parts you accidentally removed; “Erase” removes more. Work at high zoom for accurate edge work.
- Use additional elements to cover difficult areas if inpainting struggles — for instance, add a patch of texture, gradient, or simple shape and match color/opacity to disguise a seam (a creative workaround when exact inpainting fails).
- Adjust final color, contrast, and sharpness using the “Adjust” panel. If the filled area requires cloning, export to a retouching app or use Canva’s “Effects” and “Filters” to blend overall tones.
- Export the finished image. Choose “PNG” for transparency or “JPEG” for standard images; choose a higher quality setting for print.
AI App 3: Picsart — detailed step-by-step
Picsart is a flexible photo editor with strong mobile-first tools for object removal, healing, and cloning. The app offers an “AI Remove” and a classic “Remove” (healing) brush, plus layers and manual clone stamping if you need more control.
Step-by-step (mobile):
- Launch Picsart and tap “+” to add your photo to a new project.
- Open the “Tools” menu and choose “Remove” or “Remove Object.” Some versions label it “AI Remove” — that’s the automatic option that detects people and other objects.
- If you choose “AI Remove,” simply tap the person(s) you want gone; the tool will highlight and attempt removal. If the automatic detection misses areas, switch to the brush mode and paint over the person manually.
- Tap “Apply” to run the inpaint. Review the result. Use the “Clone” or “Heal” tools to refine problematic spots. Clone takes pixels from a source point and paints them over the target; heal blends them into the surrounding texture.
- For complex backgrounds, use layer duplication: duplicate the layer, remove the person from the top layer, and use blending or masks to merge the best parts of both edits.
- Finish by using small adjustments — Sharpen, Blur, Noise — to harmonize the edited area with the rest of the image. Picsart gives manual control over brush opacity and hardness; soft edges often blend better.
- Save or export: choose resolution and file format. Picsart supports export to camera roll or cloud sharing.
Step-by-step (web):
- Open Picsart’s web editor and upload your photo.
- Select the “Remove” tool or look for “Background Remover / Object Remover”.
- Use the brush or auto-detect features to mark the person. Confirm to run the AI inpainting.
- Repair artifacts using the web’s clone/heal tools. The web interface often provides larger canvas and better precision with a mouse.
- Export the final image with your preferred settings.
AI App 4: Fotor — detailed step-by-step
Fotor provides both a web editor and apps with tools for background removal and object erasing. Fotor’s “Background Remover” is straightforward, and its “Clone” and “Heal” brushes help for post-processing.
Step-by-step (web):
- Go to the Fotor editor and import your image.
- Choose the “Background Remover” from the left sidebar. If Fotor’s AI identifies the primary subject as the person you want removed, it may remove them automatically. If not, choose the “Erase” or “Clone” tool instead.
- In manual erase mode, paint over the person. Use an eraser brush to refine edges and a restore brush to bring back any accidental removals.
- Click “Apply” to let the inpainting run. Fotor’s background fill uses surrounding pixels to generate the replacement area.
- Use the “Clone” tool to copy nearby textures into the filled region and the “Heal” tool to smooth transitions. Work slowly and in small strokes for the most natural appearance.
- When the edited area still looks slightly off, use global adjustments (exposure, saturation, contrast) to match tones between fixed area and original image.
- Download your final file as JPG or PNG. For transparent exports choose PNG with an alpha channel if the platform supports it.
Refining results: manual tools and finishing techniques
Automatic tools are powerful but rarely perfect. To achieve a professional result, combine AI removal with these manual refinements:
- Healing brush: Blends pixels into their neighbors; great for small imperfections and soft textures like sky or fabric.
- Clone stamp: Copies exact pixels from a source area; best for repeating patterns (bricks, tiles) but requires careful alignment to avoid obvious repetition.
- Patch tool (where available): Cut a region from an unblemished area and blend it over the removed zone to maintain continuity of texture.
- Edge feathering: Slightly soften the edges of the filled region to match the natural blur of the photo and avoid harsh seams.
- Color matching: Use local adjustments (brush-based exposure, temperature, saturation) to fix color mismatches between the filled spot and surrounding pixels.
- Noise/grain: If the original image has film grain or sensor noise, add a subtle amount of noise to the repaired area to match the rest of the photo.
Troubleshooting common problems
If the AI fill looks wrong, try these remedies:
- Artifacted texture or weird stretches: Repaint the removal mask more precisely, reduce brush size near edges, or remove the person in smaller sections instead of one large selection.
- Repeating patterns or obvious clones: Use the clone tool to vary the pattern, rotate or scale the cloned patches slightly, and then heal to blend.
- Missing details (e.g., text or signs): If you removed a person in front of text or a unique object, AI often fails to reconstruct it. Manually recreate the text or composite in a matching element from another photo.
- Lighting mismatch: Adjust local brightness/contrast and color temperature to align the repaired area with surrounding lighting conditions.
Tips to get cleaner automatic removals
Small adjustments before removal often improve AI results:
- Use a selection that slightly overlaps the person’s edges instead of a tight outline to give the AI more context for inpainting.
- Split complex removals into several smaller passes — remove limbs first, then torso, then background details — so the AI has easier local patches to reconstruct.
- When removing several people at once, consider removing them one at a time and refining between each pass.
- For images with repeating textures (tile floors, brick walls), clone a large sample of the pattern away from the person and use it as the source for filling to keep geometry consistent.
File formats, resolution, and exporting
Always export a high-resolution file if you plan to print or further edit the image. Keep an uncompressed or minimally compressed master if possible.
- PNG: Use for images that require transparency or if you want to preserve pixels losslessly for further edits.
- JPEG: Good for sharing and web. Choose the highest quality/lowest compression for final exports to avoid artifacts around patched areas.
- TIFF: If your tool supports it and you need a print-ready master with layers and minimal compression, TIFF is ideal.
- Upscaling: If the edited area lost detail, consider a quality-aware upscaler (some apps offer this) or export to a dedicated upscaling tool to restore crispness before printing.
When to switch tools or use a hybrid approach
If one app fails to produce a convincing result, try a hybrid workflow: run the automatic removal in one app, export the result, and open it in a more advanced editor for manual refinement. For example, you might use Canva for a quick erase, then open the exported result in Picsart or Pixelcut (or a desktop editor) to clone and heal finer details.
Different apps have different strengths: Canva is excellent for design and layout with basic removal tools, Pixelcut prioritizes clean background fills for product photos, Picsart gives strong mobile healing/cloning controls, and Fotor offers easy web-based erasing and cloning. Mix and match to exploit the strengths of each platform.
Workflow example: removing a person from a crowded street photo
Here’s a practical workflow that uses multiple steps and tools to remove a person from a complex street scene:
- Open the original in Picsart (mobile) and use AI Remove to erase the person quickly. Export the result at maximum resolution.
- Import the exported image into Pixelcut or Fotor and use clone/patch to rebuild repeating textures like pavement or brickwork where artifacts appear.
- If there is still a mismatch in lighting, import the image into Canva and apply subtle global color adjustments or gradient overlays to unify the scene.
- Finally, open the combined result in Picsart or another retouching app, apply a light grain/noise filter to the whole image to mask any micro discontinuities, and then export the final high-quality file.
Accessibility and device considerations
Most of these tools are available both on mobile and web. Mobile apps are convenient for quick edits and social media, but web/desktop editors generally allow finer control with a mouse and keyboard. If you need pixel-level precision, prefer the web versions where possible, or use a tablet with a stylus for better accuracy on mobile.
Final checklist before you export
Run through this checklist to make sure the image is ready to share or publish:
- Zoom to 100% and inspect the edited area for seam lines, repeating patterns, or mismatched textures.
- Check edges and shadows to ensure they look natural and consistent with the light source.
- Apply noise/grain if necessary to match the edited area to the rest of the photo.
- Save a layered or uncompressed master where possible in case you need to re-edit later.
- Confirm that your edits comply with any rights, privacy, or usage rules that apply to the photo.
Common workflows summarized
Use this short reference to choose the best starting point:
- Quick single-person removal (simple background): Try Canva or Pixelcut first for a one-click or brush-based removal.
- Complex backgrounds with repeating patterns: Use Picsart or Pixelcut, then manually clone/patch in an advanced editor.
- Web-based convenience and collaboration: Use Fotor or Canva and export to another app for fine retouching if necessary.
- Mobile-first quick edits: Picsart or Pixelcut mobile apps are fast and provide healing and clone tools for adjustments.
With practice you’ll learn which tool produces the best first-pass removal for your typical photos and which tool you prefer for manual refinements. Combining AI speed with human judgment usually yields the most believable images.
Remember: perfection often comes from small, patient manual adjustments after the AI has done the heavy lifting. A few minutes of clone-and-heal work at 100% zoom can transform a decent automatic removal into a seamless, professional result.
Closing thoughts
Removing people from photos has never been easier thanks to modern AI-driven tools. Pixelcut, Canva, Picsart, and Fotor each offer capable solutions; your choice depends on whether you prioritize speed, fine control, or integration with design workflows. Use the detailed steps above as templates, and be prepared to combine automatic removal with manual tools for the best outcome.
Finally, edit responsibly: respect privacy and copyright, keep backups of originals, and review results closely before publishing. With good technique and these tools, you can cleanly remove unwanted people from pictures while preserving realism and image quality.


