


 (1)-20251204034946188.jpg)


Welcome to OSCAL (Well-known China brand of Android tablet, rugged phone, and portable power station) blog. Hope this guide has been helpful.
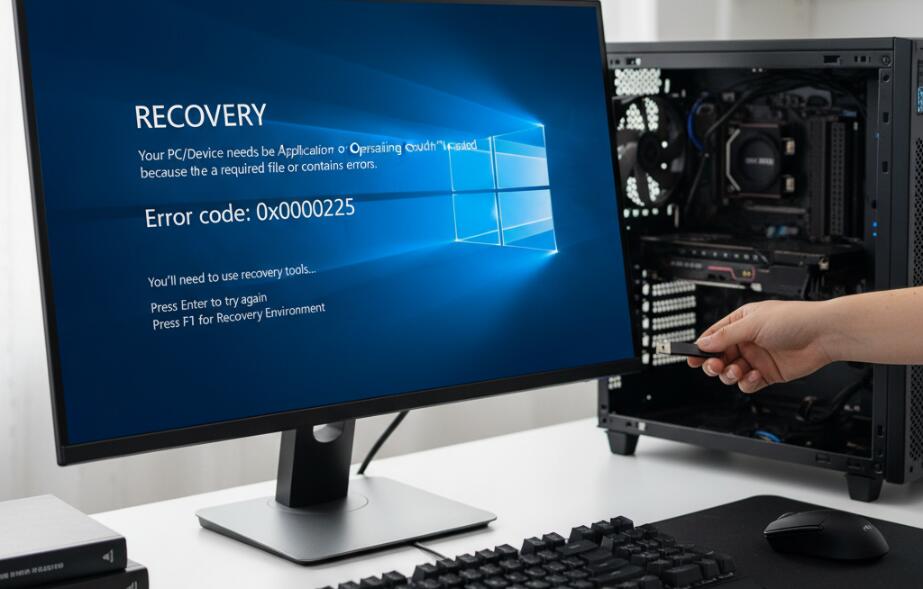
Encountering the error code 0xc0000225 on Windows 11 or Windows 10 can be alarming: the system refuses to boot, throws a black screen or recovery loop, and your important files appear out of reach. This guide explains, step by step, what the error means, why it happens, and — most importantly — how to fix it using a range of safe troubleshooting methods from non-destructive checks to more advanced repairs.
This guide assumes you can access the Windows Recovery Environment (WinRE) or have a Windows installation USB/DVD available; if not, the early sections explain how to create one. Follow the sections in order: start with the simplest and least invasive steps (check cables, try automatic repair), then move on to command-line repairs like rebuilding the Boot Configuration Data (BCD), and finally consider system restores, resets, or data recovery if the system remains unbootable.
Before you begin, pause and take a breath — most cases of 0xc0000225 are fixable. If you are unsure about any command or step, read the corresponding explanation first and then proceed. Back up data whenever possible before running destructive fixes.
What does error 0xc0000225 mean?
Error 0xc0000225 is a Windows Boot Manager (Bootmgr) error that indicates Windows cannot locate the system files necessary to boot. In practical terms, the system’s boot loader cannot find the Boot Configuration Data (BCD) entry, or the BCD is corrupted. This can result from:
- Corrupted or missing boot files after a failed update or disk write error.
- File system corruption on the system partition (for example, due to abrupt power loss).
- Wrong BIOS/UEFI settings or a changed disk mode (AHCI vs RAID vs IDE).
- Hardware problems such as a failing SSD/HDD or loose SATA/NVMe connection.
- Accidental deletion or malware that altered boot entries.
Essential precautions
Before performing repairs:
- Disconnect unnecessary external devices (USB drives, printers) — they can confuse boot order.
- If the machine is under warranty or you suspect hardware failure, consider contacting support or a professional.
- If you have critical files and cannot risk any operation, remove the drive and use another computer or an external enclosure to copy data first.
Try the quick, non-destructive fixes first
Start with easy checks — sometimes the fix is simple:
- Power cycle: shut down completely, unplug power, hold the power button for 10–15 seconds, reconnect and restart.
- Check physical connections: for desktops, ensure SATA cables and power cables to the drive are secure. For laptops, ensure the drive hasn’t shifted.
- Enter BIOS/UEFI and ensure the correct drive is set as first boot device and that the OS drive is recognized.
- If your PC uses UEFI, verify Secure Boot and Legacy/CSM settings — try toggling Secure Boot off temporarily if booting fails.
Access Windows Recovery Environment (WinRE)
If the system cannot boot, you’ll need WinRE or a Windows installation media to run repair tools. There are two main ways:
- If your PC shows the recovery screen, choose Advanced options > Troubleshoot > Advanced options.
- If not, create a bootable Windows USB on another working PC using the Microsoft Media Creation Tool. Boot from that USB, select your language, then choose Repair your computer rather than Install.
Run Automatic Repair (Startup Repair)
From WinRE choose Troubleshoot > Advanced options > Startup Repair. Windows will attempt to detect boot issues and fix them automatically. This is safe and non-destructive. If Startup Repair succeeds, reboot and confirm normal operation. If it fails or returns the same error, continue with the manual steps below.
Use the Command Prompt to repair Boot Configuration
If automatic repair doesn’t help, use the Command Prompt from WinRE (Troubleshoot > Advanced options > Command Prompt). These commands rebuild or repair the BCD and other boot files.
Step 1 — Identify the system partition:
Type:
diskpart
Then in diskpart:
list disk
Select your disk (usually Disk 0):
select disk 0
List volumes to find the EFI or System Reserved partition:
list volume
Look for a small FAT32 volume (~100–300 MB) — that’s usually the EFI system partition (UEFI systems). Note its volume number; if there’s a 100–500 MB NTFS partition, that might be the System Reserved partition for legacy BIOS systems.
Exit diskpart:
exit
Step 2 — Repair for UEFI (EFI) systems
Assuming the EFI partition is volume 2 (replace with the right number) and you’ll assign it a temporary drive letter like S:
diskpart
select volume 2
assign letter=S:
exit
Now recreate the BCD files:
cd /d S:\EFI\Microsoft\Boot\
bootrec /fixboot (sometimes requires extra steps if access is denied)
bcdboot C:\Windows /l en-us /s S: /f ALL
This copies fresh boot files to the EFI partition. If you get “Access denied” on bootrec /fixboot, try running:
ren S:\EFI\Microsoft\Boot\BCD BCD.bak
bcdboot C:\Windows /l en-us /s S: /f ALL
Step 3 — Repair for legacy BIOS (MBR) systems
Use these commands to fix Master Boot Record (MBR)-based problems:
bootrec /fixmbr
bootrec /fixboot
bootrec /scanos
bootrec /rebuildbcd
If rebuildbcd fails to add your Windows installation, you can export and rebuild the BCD manually:
bcdedit /export C:\BCD_Backup
attrib c:\boot\bcd -h -r -s
ren c:\boot\bcd bcd.old
bootrec /rebuildbcd
Check and repair the file system
Corrupted file systems can prevent Windows from reading boot files. Run Check Disk on the system volume.
From Command Prompt, run:
chkdsk C: /f /r
If chkdsk finds and repairs errors, reboot and test. Be patient: /r can take a while on large disks.
Run system file checks (SFC and DISM)
These tools repair Windows system files that may be missing or corrupted.
From Command Prompt in WinRE, run:
sfc /scannow /offbootdir=C:\ /offwindir=C:\Windows
Then run DISM cleanup (DISM needs an online image; when offline from WinRE, point to a mounted Windows image if required — on many systems these command variations still work):
dism /image:C:\ /cleanup-image /restorehealth
These commands verify and replace corrupted system files. Reboot and check if Windows starts.
Use System Restore or Uninstall Recent Updates
If the error appeared after a recent update or software install, use System Restore (if you have restore points) from WinRE: Troubleshoot > Advanced options > System Restore. Pick a restore point from before the problem began.
Similarly, from WinRE you can choose Uninstall Updates to remove the latest quality or feature updates that might have caused instability.
Try Safe Mode and Driver/Hardware checks
If you can get to Safe Mode (WinRE > Troubleshoot > Advanced options > Startup Settings > Restart > choose Safe Mode), you can roll back drivers or uninstall recently added drivers that could be corrupting boot. Also run hardware diagnostics from the manufacturer’s tools and check SMART status if possible to verify the drive’s health.
If repairs fail: Reset or Reinstall Windows
When all else fails, use Reset This PC (Keep My Files) or a full reinstall. Both are accessible from WinRE > Troubleshoot.
- Reset This PC (Keep My Files): Windows attempts to reinstall while preserving personal files. Apps are removed, so be prepared to reinstall them.
- Reset This PC (Remove Everything) or Clean Install: This erases everything on the system drive and reinstalls Windows. Only use this after you have backed up critical data.
Data recovery before destructive operations
If you must recover files before reinstalling, consider these options:
- Remove the drive and attach it to another working PC (via SATA cable or USB enclosure) and copy files.
- Boot a Linux live USB and manually copy files to an external drive.
- Use third-party recovery software from a separate machine to image the disk, then recover files from the image.
Common pitfalls and how to avoid them
Here are mistakes people often make and how to avoid them:
- Skipping backups: Always back up before major repairs. If you can’t boot, remove the drive to copy files elsewhere.
- Using the wrong disk in commands: Confirm disk/volume numbers with
diskpartandlist volumeso you don’t write to the wrong partition. - Ignoring hardware faults: Repeated boot errors may indicate a failing drive; run manufacturer diagnostics and consider replacement if SMART reports problems.
How to prevent error 0xc0000225 in the future
Prevention is better than cure. Follow these best practices:
- Keep Windows updated and set restore points before major updates.
- Use a quality UPS to avoid corruption from sudden power loss.
- Run regular disk checks and monitor SMART attributes for early warning signs.
- Keep an up-to-date recovery USB or system image that you can boot to restore quickly.
When to seek professional help
If you suspect hardware failure (clicking drives, SMART errors, the drive isn’t recognized in BIOS), or if you’re uncomfortable with command-line repairs, contact a professional technician. If data is extremely valuable and irreplaceable, consider professional data recovery services — they can be expensive but are often the best option for physically damaged drives.
Quick troubleshooting checklist
Run this checklist from simplest to most involved:
- Power cycle PC and remove external devices.
- Confirm BIOS/UEFI sees your drive and boot order is correct.
- Run Automatic Startup Repair from WinRE.
- Use Command Prompt to repair BCD and run
chkdsk,sfc, anddism. - Try System Restore or uninstall recent updates.
- Reset or reinstall Windows (after backing up files).
- Replace drive if diagnostics show failure and restore from backup.
Note: if you use the command prompt frequently for these steps, keep a text file with the exact commands you need so you can copy-paste them into WinRE easily.
Recovering from error 0xc0000225 is often a process of elimination: check hardware, repair boot files, fix file system errors, and only reinstall if necessary. The methods above cover the spectrum from safe to more invasive, giving you the best chance of bringing your system back without data loss.
Good luck — follow the steps carefully and avoid hasty destructive actions. If anything in the process returns an error message, copy the message and include it when you ask for help so the next steps can be precisely targeted.


